• Tour Our Home
  • Decorating
  • Lifestyle
  • DIY
  • Wellness
  • Essential Oils
    • Bloglovin
    • Facebook
    • Instagram
    • Pinterest
    • Twitter

Decorchick!

How To Paint Stripes | And Painting Stripes on Textured Walls

I find it ironic that I’m doing a post on how to paint the perfect stripes, especially since it took me 3 times to get it right, but practice makes perfect right? And well, my stripes came out pretty darn perfect with our textured walls so it deserves a little attention.

How To Paint The Perfect Stripes Tutorial, and Painting Stripes on Textured Walls | www.decorchick.com

I need projects like this spelled out very clearly for me so I hope this tutorial helps you guys. After all, we already know I’m no expert in painting stripes. :)

First thing you need to do is measure your wall from floor to ceiling. Or ceiling to floor. My wall was 104 inches from the top of baseboard to the ceiling. I wanted 9 inch stripes because I thought that would be a good width. So when you divide those 2 numbers together that gives you 11.5, so that means I’ll end up with 11 1/2 stripes when I’m done. Not a perfect number but fine with me. I’d much rather measure off an easy number like 9 for my stripes, than something like 9 3/4. That would be lame.

I started from the bottom just because. I’d probably start at top next time.

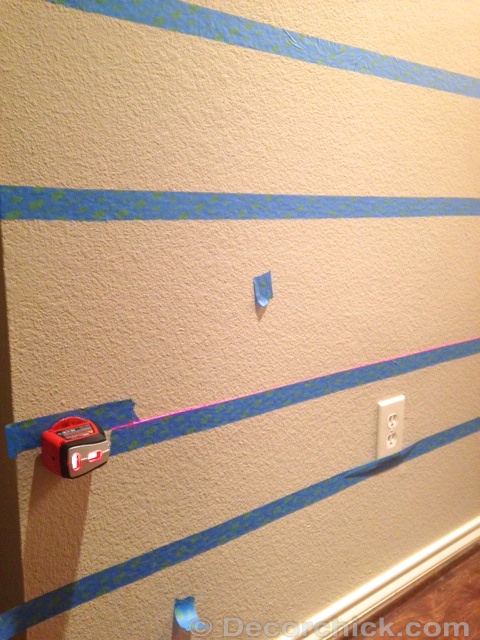
Laser Level Stripes | www.decorchick.com

Now trying to write out how to measure off taping properly is tricky. I taped off wrong twice before I got it right. Just be sure you take into account the width of the tape you are using. So for each 9inch stripe you tape off, I measured each time with a tape measure. I measured 9inches on the tape measure, taped off, then measured 9 inches again, but just be sure on that next stripe that you are measuring the tape that you just taped off below as well, because that gives you about an inch or 11/2 inches. Make sense? It will once you start taping off.

The other thing you have to think about is when you tape off, is if you need to put the tape below or above the laser line to get the right width for that particular section. Just keep that in mind and you will understand once you start doing this. And definitely use a laser level for this project!

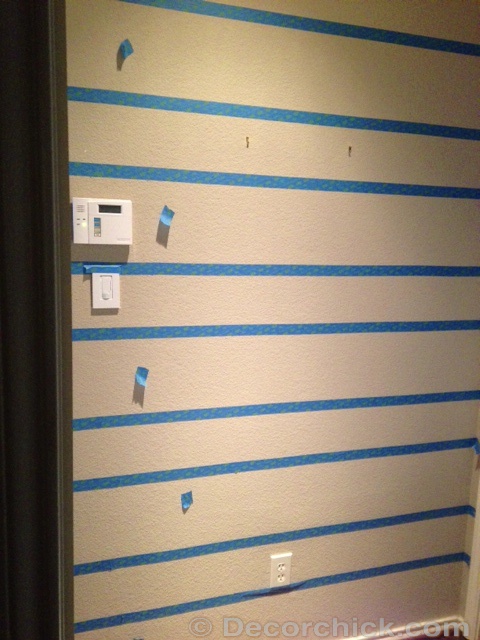
The stripes that you see that have a spare piece of tape in them are the sections I did not want to paint. So I’d recommend doing that too.

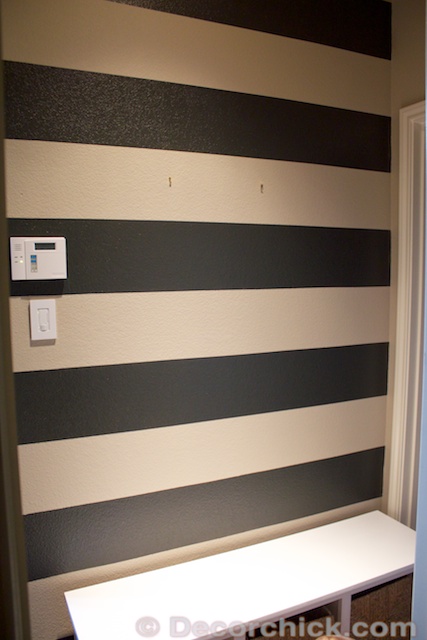
And once you have taped off correctly, it should look something like this.

How To Tape Off Stripes | www.decorchick.com

The sections will look uneven and that’s good! That means you have completed this awful task.

Now for the fun part! Painting them! And FYI-I kept our original wall base color the same, but if you need a different color, you will need to paint that entire wall first and let it dry good before taping off stripes.

When I mentioned to my Facebook and Instagram fans I was doing stripes everyone said to be sure and paint the main base coat on top of the tape on the sections I am painting to prevent bleed through. THEN paint the black stripe color on top of that. I had read that several places before as well so that’s what I did. And that step is totally necessary for textured walls. I’d do it for non-textured walls too just because I know it works.

Wall-Base-Color-Stripes

Base-Color-Painting

I did that part with a paintbrush, and I did it heavier than dry-brushing, but not as heavy as if I were painting trim or something. Just don’t get the tape too wet or it might shift around. But I must reiterate, that step is a MUST to nice crisp lines.

Once that was all done (only takes a second to do), then I used the dark charcoal grey that I used on the pantry door and painted those stripes with a foam roller.

Foam Roller for Painting Stripes

I did about 3 coats of the dark grey. Then it’s important to immediately remove the tape once you are done painting. The paint was still very wet and that is also key to a nice line. Plus the added bonus is that you get to see your handy work instantly!

How To Paint Stripes on Textured Walls | www.decorchick.com

I oohed and ahhed many times. Out loud. Not gonna lie.

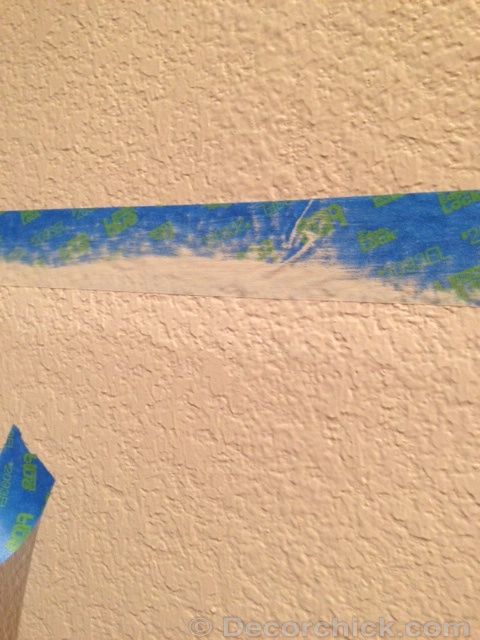
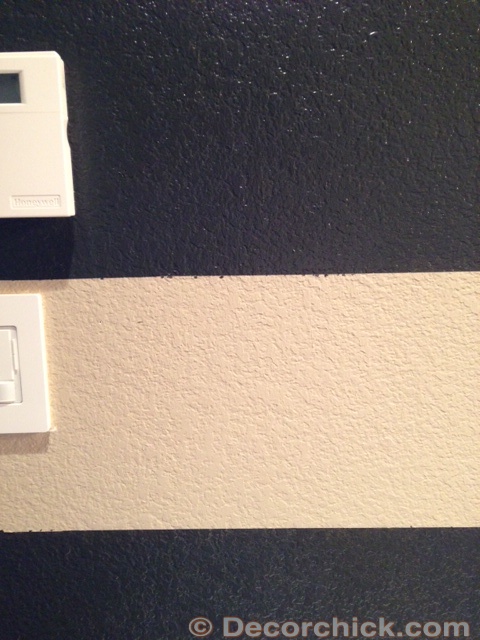
And I want to show you what very little seepage did occur.

Imperfect-Stripes

It’s really very minimal and only happened in 2 areas. I just went over it with a paintbrush to touch them up.

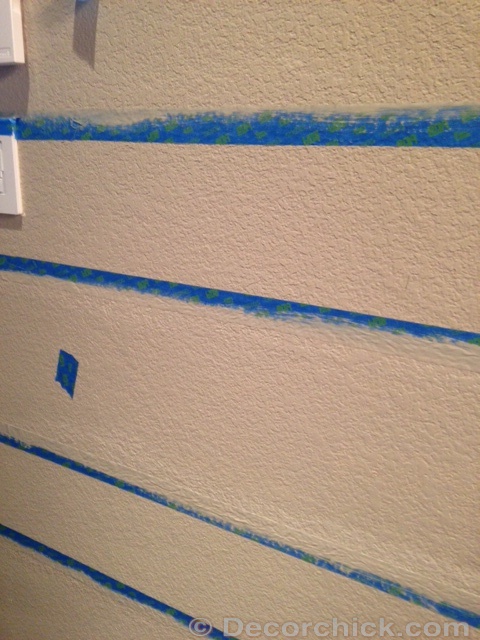
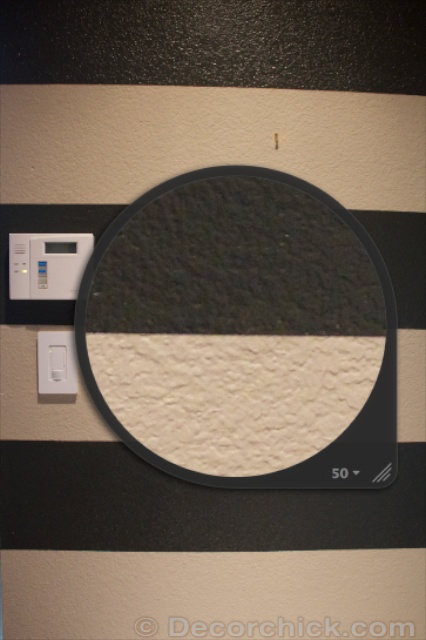
Also, I want to show you all exactly how crisp the lines are too! I think it’s pretty amazing for all of the texture on our walls. Gag, I hate textured walls. But this photo I took a screenshot of when I was editing my photos in my photo editing software. I had it on the magnifying glass so I could see details with a magnified view.

Perfect Stripes Textured Walls | www.decorchick.com

Pretty cool right? That little trick to prevent bleed through really works!

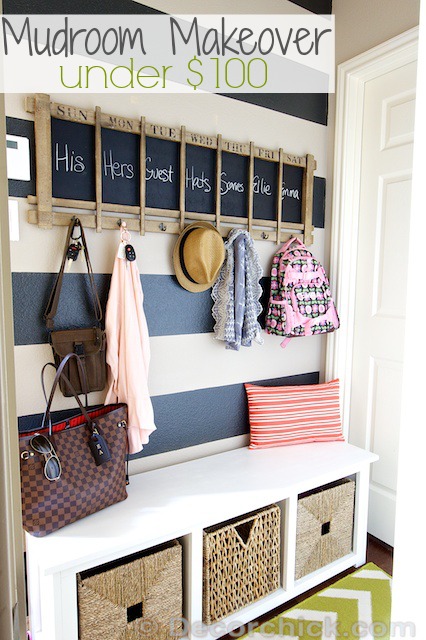
To see how this room came out in the end, this is now our mudroom which I posted about here.

All of the details can be found in that post.

So I think that concludes the little tutorial!

How To Paint The Perfect Stripes Tutorial, and Painting Stripes on Textured Walls | www.decorchick.com

Don’t be scared to try it. I waited months because I was so scared then kicked myself afterwords because it’s not bad once you do it once. Or three times. :) But just a warning…you’ll want to stripe everything after you do it once!

Have you painted stripes before? Any other favorite tricks you have?

xxoo,

Decorchick!

Filed Under: Decorating, DIY, Paint, Projects, Tutorial Tagged With: How To Paint Stripes, How To Paint Stripes Tutorial, Mudroom, Mudroom Stripes, Stripe Tutorial, Textured Walls

Follow me and see my updates!

  • Bloglovin
  • Facebook
  • Instagram
  • Pinterest
  • Twitter

Don’t Miss The Good Stuff!

Please subscribe and be the first to hear about my latest ramblings!

No SPAM ever!

« What Life Is Like With New Lights
Behind The Scenes »

Comments

  1. Myra @ MyBlessedLife.net says

    September 30, 2013 at 2:31 pm

    Haha! So glad the stripes finally worked out! :)

  2. Kelly Wyatt says

    September 30, 2013 at 7:47 pm

    Awesome work! I like the design, color coordination and the floor mat makes for a super cute final touch. Thank you for sharing.

  3. Antoinette says

    September 30, 2013 at 9:16 pm

    Okay,
    Now I’m oohing and ahhing. That looks darn good. Great job!

  4. Julie Jamison says

    October 1, 2013 at 4:05 pm

    Your walk came out soooo prreetty! Im going to definitely try this project one day! Thanks for the tip as well!

  5. April S says

    October 2, 2013 at 12:45 am

    I recently just did this to my really awkward space and I love it- and yes I ooohed and aahed too and had to send pics to everyone before I blogged about it. I {love} your charcoal grey. That is a really great color!!

  6. Natalia Magdalin says

    October 2, 2013 at 11:04 pm

    “The stripes that you see that have a spare piece of tape in them are the sections I did not want to paint. So I’d recommend doing that too.” Based on the pictures, you did the opposite and painted where you had the little tape pieces. Just FYI. But I have to say, I does look AMAZING in the end. Great job!

  7. Kevin Roberts says

    October 4, 2013 at 8:03 am

    I think when it comes to painitng kitchen walls, it tend to get a little more complicated. Since the whole process involves minding cabinets and other assorted appliances, it gets a bit tricky.

  8. National Paint Contractors Cape Town says

    October 11, 2013 at 4:20 am

    That looks awesome. The hardest part is to not get that paint to bleed through the tape, but you have done an amazing job of it.

  9. Becca says

    January 17, 2014 at 7:49 pm

    I used your method yesterday and it worked great. Thanks!

  10. cotton hoodie says

    July 6, 2015 at 1:45 am

    Magnificent items from you, man. I’ve keep in mind your stuff prior to and you are just too excellent.

    I really like what you’ve got right here, really like what you’re stating and the way in which you assert it.
    You are making it enjoyable and you continue to take care of to stay it sensible.
    I can not wait to learn far more from you. This is really a wonderful web site.

  11. painting-stores.com says

    December 24, 2015 at 3:00 pm

    Hello colleagues, how is all, and what you want to say regarding this post, in my
    view its genuinely awesome designed for me.

Trackbacks

  1. Mudroom Makeover Under $100! | And A Striped Wall - Decorchick! says:
    October 7, 2013 at 9:43 am

    […] I have to say I am pretty impressed with those stripes with nice crisp lines because we have very textured walls! Okay, yes I better do a separate post on those stripes eh? (UPDATE: See How To Paint Stripes Tutorial Here) […]

  2. Wir gehen auf Streifzug | mitStil.net | Das Online Lifestylemagazin says:
    March 26, 2014 at 5:49 am

    […]  www.trendinozze.blogspot.co.at,  www.floresenelatico.es,  www.weddingconcepts.co.za,  www.decorchick.com,  www.designspiration.net,  www.etsy.com, […]

  3. Harper’s nursery reveal | suddenly inspired says:
    August 26, 2014 at 9:27 pm

    […] and Dove White. Painting the stripes was a little daunting on our textured walls, but I followed this tutorial I found on Pinterest and it turned out great! My best friend Amanda was a huge help for […]

  4. Inspiration Board No. 4 : Under the Oaks | Call me Callie says:
    January 16, 2015 at 9:02 am

    […] Oysters: Unknown | Tablescape: Patrick Moyer via Style Me Pretty Black & White Wall: Decor Chick | Lace + Tux: Once […]

  5. Little Finds: Simple, Printed Goodies | says:
    March 17, 2015 at 8:46 pm

    […] my room that I will be filling with little designs. For now though it is striped heaven! I followed this tutorial I found on Pinterest, which was way easier than I thought. If you’re looking to do this to […]

  6. Under the Oaks: Florals | Call me Callie says:
    April 7, 2015 at 9:03 am

    […] Petaja via Once Wed | Jose Villa via Flowerwild Designs | Decor Chick | Unknown Buffy Dekmar Photography via Style Me Pretty | Unruly Things Josh […]

  7. What I'm Into Volume 14 - A Pop of Pink says:
    July 9, 2015 at 9:55 am

    […] It would be so fun to have a striped wall. Here’s how to get the perfect paint stripe. […]

Hey friend!

I’m Emily and love my family, faith, decorating, travel, fashion, and healthy living. And our Goldendoodle Louis, and now two kitties! I can’t wait to share with you more of our imperfect lives, and home. Get cozy and come on in!

Click Image to Read More About Emily

Follow me and see my updates!

  • Bloglovin
  • Facebook
  • Instagram
  • Pinterest
  • Twitter

Don’t Miss The Good Stuff!

Please subscribe and be the first to hear about my latest ramblings!

No SPAM ever!

Search…


Popular Posts

· The Great Pantry Makeover
· My Fake Mantel
· Weight Loss Journey
· A Pretty Yarn Wreath
· DIY Aqua Mason Jar
· Fake Wainscoting Tutorial
· DIY Paneled Wall
· A Dining Room Turned Office
· All You Need is Drama

Our Home Tour & Paint Colors

Fall Projects

Tour Our White Kitchen!

Fall Projects

Paint Your Cabinets Like the Pros

Fall Projects

Weight Loss Journey

Fall Projects

Join us on Instagram

2 months later, and it’s still hard. So very har 2 months later, and it’s still hard. So very hard. It is the strangest, most emptiest feeling one could have, and one that not everyone understands.

Tonight was the 3rd griefshare meeting that I’ve attended, and that does help to be around others who have lost someone close. But it is also so painful hearing their stories. And it’s a night during the week that I’m forced to think about how he’s no longer here. It’s helped me to realize all of the thoughts and actions we have are normal, and the things we do that are odd to others, are actually part of the process.

I haven’t been able to wear these shirts of his yet (he wore them every single day. The red one was his “fancy” one), but I’m glad I have them. It’s just really crappy I can’t see him in them any longer. 💔
When your friends come from Alabama to be with you When your friends come from Alabama to be with you for a tough day ahead. There are no words for how good Myra and Ernie are to us. ❤️❤️❤️We love y’all so much! @my_blessed_life @yarbrough4house
The picture @randyallison looks forward to every y The picture @randyallison looks forward to every year because our animals are so well behaved. 🤪Merry Christmas friends. 🎄

It’s Cookie’s first Christmas and she is very excited. 👅
This is a pain like no other. I watched him take This is a pain like no other.

I watched him take his final breath at 7:24 this morning. The scent of him is still so palpable.

Gone too soon, and years stolen from his wife and grandkids.

We live in the same small neighborhood, right around the corner on the next street. Now the girls can’t ride their 4-wheelers to go see him. We can’t just swing by to pick him up. He can’t go on our walks anymore. There are lots of no-longers, and it is crushing my heart.

Who am I going to call now when I have a question on how to fix something? He had a solution for everything usually saving us hundreds of dollars. Everything was fixable to him, rather than hiring someone. And often he would find the answer on YouTube.

Who am I going to text with when the Astros make a good or bad play during the next World Series?

I want to hear his voice again. I want to go over and cut his hair again. I want to make him another pie for his birthday and Father’s Day.

It hurts so much.

I love you Daddy.
They say you start to look(or dress) like your pet They say you start to look(or dress) like your pets, and well, they aren’t wrong. This happens more times than I’d like to admit.😅🐶
She’s always going the extra mile. All I wanted She’s always going the extra mile. All I wanted was a pic of her and the pretty tree, and she gives me the splits.🥰
Follow on Instagram

Search

Copyright © 2025 · Decorchick®
  • Contact Me
  • Press
  • Advertise
  • How and Why to Join Young Living Essential Oils
  • Login