Hey guys, my hubby is posting today on how to install the Flow Wall garage system since he’s the genius behind making our garage amazing like this, so enjoy!
Hello everyone. I’m Emily’s husband and she asked me to share with y’all my experience installing our Flow Wall storage and organization system. (Please see the makeover post for the before and afters) I’ll be the first one to tell you that I shudder at the thought of putting things together. I have spent countless hours putting together things like swedish furniture, shelves and entertainment systems, staring blankly at hundreds of parts that look NOTHING like the crude illustrations on the poorly written instructions I am trying to decipher. For an ADD/OCD person like me, I’m not lovin’ it. I am very pleased to announce that the Flow Wall system was the easiest, most well documented system I have ever had the pleasure to build. I was left with a sense of pride and accomplishment when I was finished, which is very rare for my OCD.
So without further ado, I would like to share some of my experiences with you.
The packages were delivered very promptly from the company. In fact, so quick that when Emily told me that the packages were getting ready to ship, I was expecting to just kick my feet up and wait…ahhhh! Except before I was able to kick my feet up, the packages were all neatly stacked in our garage and Emily was ready for me to get to work.
The contents of the boxes were clearly labeled on the outside, complete with dimensions so that you didn’t have to open several boxes to find the next item to build. I was so impressed by the packaging. Everything was neatly, carefully and consistently packaged. There was not a single scratch or ding on any part of the system.
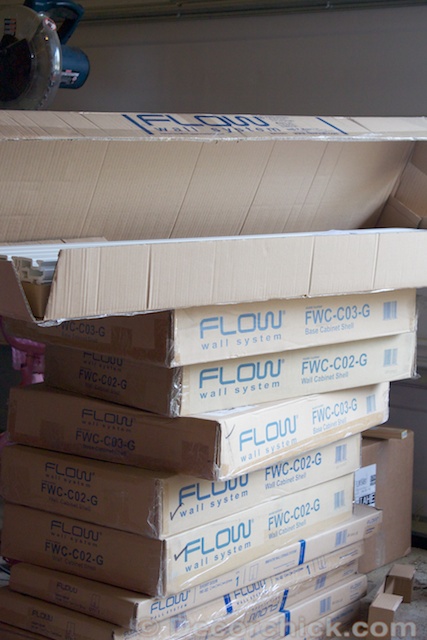
The most impressive thing about the packaging…there was not a single item missing. Not a screw, not a washer, not anything. In fact, what I thought was ingenious was the way they packaged most of the hardware pre-assembled. This ensures that all pieces are accounted for and you get a clear picture of how the parts go together instead of looking at cave drawings.


One of my most indispensable tools for projects of all sorts is my iPad and an app called Evernote. With Evernote, I can upload notes, links, documents and keep them organized all in one project folder for quick reference. Flow Wall has excellent documentation online like YouTube videos that I linked to in my Evernote project folder. I even uploaded a pdf file of the installation instructions to Evernote. Any thoughts, ideas, notes, measurements, etc, I kept handy on my iPad.

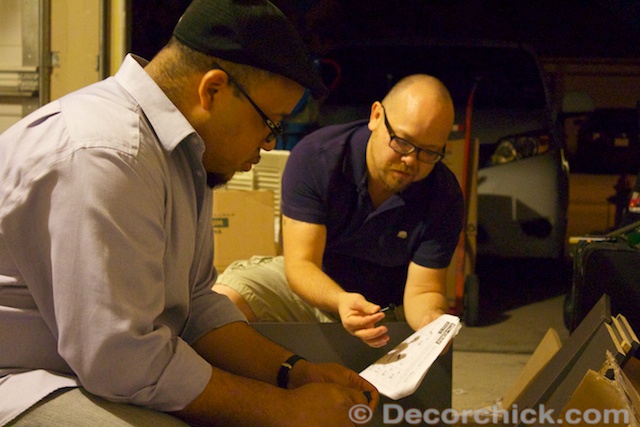
This is James Williams III, one of my greatest friends in the world. He is an amazing trumpet player, a super intellectual guy and all around nerd like me. He dropped by to help me one evening…we mostly talked about life and listened to music. We almost had a productive evening together, haha.

Now to get started, you will need a good stud finder to locate the studs. Once you find a couple of them, then you can quickly measure the distance between the two and mark the rest of them. The standard distance between two studs is 16 inches. However, in some cases they may be 24 inches apart.
Other tools needed for the installation are a good power drill with a #2 Phillips bit, tape measure, your favorite pencil, caulking gun with construction adhesive (we used LocTite Foam Board), a long t-rule (which was cool since I always wanted one and Emily was more than happy to go to Home Depot to pick one up for me), and a long level.
The last image I wanted to share was what I thought was some ingenuity. I used a scrap piece of wood to mark, level and support the panels into place so I could drill screws into the studs. It would have been easier to have someone help hold the panels in place for me while I put the scrap wood in place, but I totally went ancient Egyptian and used another piece of scrap wood to hold everything in place instead.

With each panel I installed, I became more and more nervous as the gap between me and the electrical outlet in the middle of the wall narrowed. Once I got to the outlet, it was a piece of cake, marking my measurements and using a trusty jigsaw. This happened one evening around 1:00 AM in the morning, and the adrenaline rush kept me awake until at least 3:00 AM. I walked out to the garage to admire my handy work at least 5 times before I went to sleep. I know some of you men out there can relate to this!
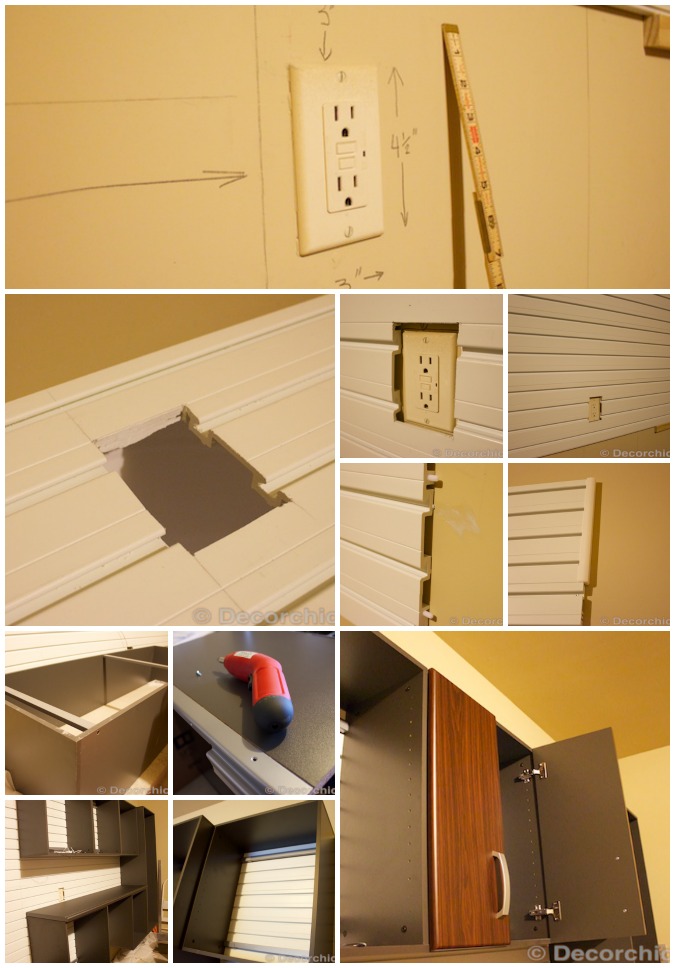
Cabinet installation went smoothly too since the instructions were well written, so you don’t really need a step by step for that. Just remember that they are all modular so you can move these around at any time on the Flow Wall panels. Super convenient.
Well, I hope you had as much fun reading this as I did writing it. I love our system. The company goes through great lengths to make sure that you enjoy a very easy and intuitive installation. Now I am looking at three other walls in our garage that could use some love.
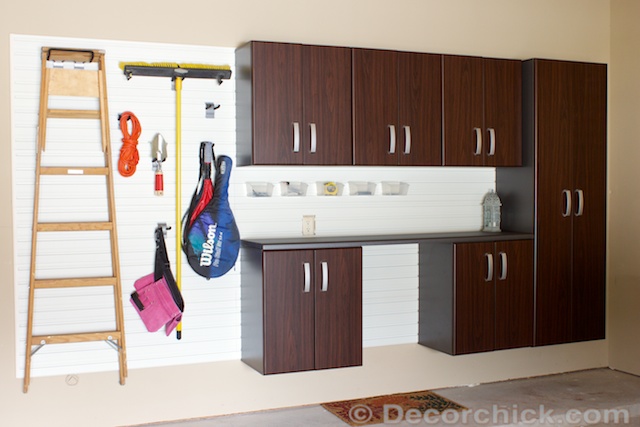
And one last time, here’s the after shot again.
Yay hubby!! Thanks so much honey for posting and building out the system. It gives me good tingling feelings to walk out in the garage now. That I can even say the words “walk in the garage” in the same sentence is amazing.
Also, Flow Wall is having a special discount for you all until the end of December! Enter the code viw965 when you check out at FlowWall and you will save 15% off your entire order! Woot! What an amazing Christmas gift this would be. Like, the ultimate.
If you haven’t seen the full makeover post of the garage makeover, you must. It is pretty amazing!


Thank you so much for the step by step. It looks absolutely amazing. I am sure everyone of your readers are drooling over this system. It is definitely on my to do list for 2014. My garage is so sad.
I need one of these systems!! It looks so great!
It looks amazing and what a great tutorial! And I’m not a man but can totally relate to the adrenaline rush of doing something yourself and admiring your handiwork! :)
It looks great! I remember the before pics and the difference is HUGE!
Wonderful instructions and what a great looking unit! I was hesitating getting it myself but now know where to come for a little one on one info. Congrats on your new garage! :)
Your garage is AMAZING! It is on my list for this spring when it warms up here in Utah. I can’t wait! What a great post. I am going to have my hubby ready it :)
This looks amazing! Great job! My hubby is not too DIY handy but I’m still dreaming of doing a wall like this in our garage next year :-). Thanks for the tips!
It looks amazing. I would love to do something like that at our #1905Cottage.
xxox
It looks awesome! I bet it feels so good for things to have their own space, not all tossed in a pile. lol Thanks for the great tips!
Oh my :) superb tutorial, I will be looking forward to work it out with my hubby ;)
How long did this install take? looks great!