Hi everyone, today I am doing a blog swap with Amanda at The Hand Me Down House! I’m so excited for her to be a guest on my blog as she is full of creativity and has an awesome blog. Soooo, take it away Amanda!
Hello Decorchick Fans!! I’m SO excited to be blog-swapping with Emily today! I’ve loved this blog since the minute I read it. She has SUCH an awesome blog and so many great ideas — although you guys already know that. :)
In case you don’t know me…. I’m Amanda from The Hand Me Down House.
I too love anything DIY — from home projects to crafts. I’m always looking for a fun project that’s inexpensive and cute (some of my favorite words together!) I live with my hubby, Kevin in our Minnesota home — and we call it our Hand Me Down House because it’s actually my childhood home — handed down from my parents’.
Today I’m going to show you some of my favorite projects and crafts from The Hand Me Down House.
And now I’d like to show you how to make a fun fall wreath for just a few dollars:
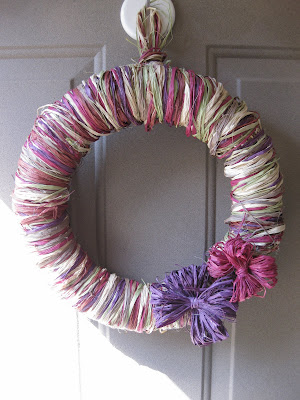
So to celebrate the autumn season, I decided to make a Fall Wreath to hang on the front door.
I used some decorating raffia, a wreath form and my glue gun.
I got this raffia at Michael’s for around $4.00 with my 40% off coupon, and I managed to find the straw wreath form at Goodwill for $2.00.
First I took thee or four strands of each color raffia and glued one end of the bunch to the wreath.
Then I wrapped them around the wreath tightly. I glued the end of the stands to the wreath and then started another bunch of raffia, overlapping the end of the previous bunch so no ends would be sticking out.
I continued doing this until the whole wreath was covered with raffia.
At the end there were a lot of loose ends and pieces sticking out. I trimmed as many as I could with scissors, and then the ones that I couldn’t trim short enough, I glued down (I tried to do most of my gluing on the back of my wreath where it wouldn’t be seen).
Now that my wreath was done, I decided to make raffia flowers. First I took the purple colored raffia and grabbed five to six strands.
I wrapped it around a cardboard form (or you could use your hand) so that it is uniform and even, like this:
Then I wrapped another piece of raffia around the middle and tied it in the back to secure it like a bow.
Then I made another “bow”, exactly like the one shown above and glued them on my wreath in an “X” to make a flower.
Finally, I hung it on the door and admired it. :)
What do you think??
I’m so glad to be over here today showing you my projects. I’d LOVE for you to stop by and say “hello!” too! :)
Thanks again to Emily for swapping today! :) I’m so honored to be over here on such an awesome blog!
Thanks so much Amanda for sharing some of your awesome projects with us! I hope you all will go and visit Amanda and become a “regular” on her blog. She’s so talented and a great DIY-er. :) So what are you waiting for? GO! :)
xxoo,
Decorchick!


I’ve enjoyed my visit here today. I came by way of The Hand Me Down House. Blessings to you!
T
Amanda,
You are always so clever! I absolutely love this wreath! :)
Hi, I popped over to stalk Amanda, and I’m delighted to have found your blog through her.
Enjoyed the visit. What a great wreath. So creative!!
I love both Amanda’s and Emily’s blog. Keep it up ladies! Keep those creative ideas comin’ I’m eating up every word!
Brittany
http://www.prettyhandygirl.com
Um…I heart this entire post! So cute!!! :)
Love this wreath idea! How fun and inexpensive. Great idea to go to a Good Will to get the wreath, they are a dime a dozen usually. Nice.
I adore Amanda’s blog! Been following her for a while and love her creativity. Nice to see her purty lil face here!
i gave you a award!
http://saradietcokelooover.blogspot.com/